Why would you want to tunnel VNC traffic over SSH?
VNC as we know is a graphical desktop sharing system. It uses Remote Frame Buffer(RFB) protocol to remotely control another computer. By default, RFB is not a secure protocol. So in order to make it secure with encryption, we would need to tunnel traffic over SSH.
To tunnel VNC traffic over SSH, the following requirements need to be met :
- OpenSSH server on the host computer (http://www.openssh.com/)
- VNC server software running on the host computer(in this case we will be using TightVNC : http://www.tightvnc.com/)
- PuTTY client on the client computer (http://www.chiark.greenend.org.uk/~sgtatham/putty/download.html)
- VNC client software (it will be part of the package for the TightVNC installer)
- Two cups of coffee and some spare time
Let’s first begin with the host computer and your first cup of coffee.
1. Configure OpenSSH
blackMORE Ops has a great tutorial on how to get this done. Have to say, it’s the best tutorial that we have come across. Here is a link to it, configure an OpenSSH server.
2. Installing VNC software.

sudo apt-get install tightvncserver
For Kali Linux, we did not have to install TightVNC. It was already there. Next up, running TightVNC on the host computer.

In order to start TightVNC, just run the commands below. You will be asked to create a password to continue. This password you will need to access the host computer.
tightvncserver
Enter Password:
Verify Pasword:
Starting VNC at boot.
You might want to start the VNC service at boot, rather than having to log in every single time you want to use it. In order to do that, copy the contents of the code below, create a file called tightvncserver and put in the following location “/etc/init.d/tightvncserver”
The following script was taken from, http://www.abdevelopment.ca/blog/start-vnc-server-ubuntu-boot.
#!/bin/sh -e
### BEGIN INIT INFO
# Provides:          vncserver
# Required-Start:    networking
# Required-Stop:     networking
# Default-Start:     3 4 5
# Default-Stop:      0 6
### END INIT INFO

PATH="$PATH:/usr/X11R6/bin/"

# The Username:Group that will run VNC
export USER="<username>"
#${RUNAS}

# The display that VNC will use
DISPLAY="1"

# Color depth (between 8 and 32)
DEPTH="16"

# The Desktop geometry to use.
#GEOMETRY="<WIDTH>x<HEIGHT>"
#GEOMETRY="800x600"
GEOMETRY="1024x768"
#GEOMETRY="1280x1024"

# The name that the VNC Desktop will have.
NAME="my-vnc-server"

OPTIONS="-name ${NAME} -depth ${DEPTH} -geometry ${GEOMETRY} :${DISPLAY}"

. /lib/lsb/init-functions

case "$1" in
start)
log_action_begin_msg "Starting vncserver for user '${USER}' on localhost:${DISPLAY}"
su ${USER} -c "/usr/bin/vncserver ${OPTIONS}"
;;

stop)
log_action_begin_msg "Stoping vncserver for user '${USER}' on localhost:${DISPLAY}"
su ${USER} -c "/usr/bin/vncserver -kill :${DISPLAY}"
;;

restart)
$0 stop
$0 start
;;
esac

exit 0
Replace <username> in the script above to an user name that you have on the host computer.
Make the script executable
sudo chmod +x /etc/init.d/tightvncserver
Run the script so that it starts automatically at boot.
sudo chmod +x /etc/init.d/tightvncserver
sudo update-rc.d tightvncserver defaults
Reboot the host computer and check if the TightVNC service is running. If not, you are doing something wrong, re-check your steps.

To find out which port on the host computer where the TightVNC service is running, and the IP address; follow the steps below.


ifconfig
sudo lsof -i -P | grep -i "listen" | grep vnc
Ports 6000+N are used as X Server Port
Ports 5900+N are used as VNC Client Port, and this is the port that we are interested in.
For us, the IP address is 192.168.56.102 and the port number is 5901.
Now that we have our host computer ready, let’s move on to the client computer. We are halfway through and you should be midway through your first cup.
Client computer configurations
1. Configuring PuTTY
Double click on PuTTY, you should get a window like the one below.
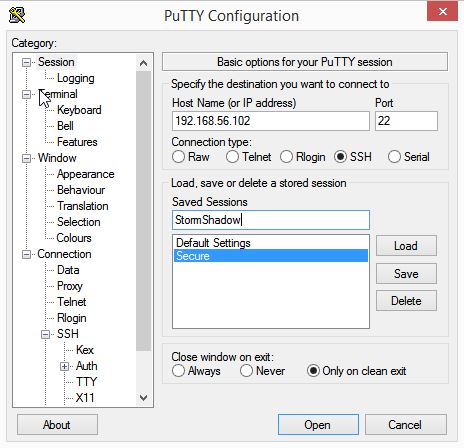
Enter the Host Name, the IP address of the computer where TightVNC Server is installed.
In our case, the Host Name is the address within the Host Only Address namespace in VirtualBox.
Once that is done, enter a name for this session under Saved Sessions and then click Save. That will come handy when we have to configure the remaining settings.
Next under SSH, on your left hand window, click on the + icon. Under there, click on X11.
Check Enable X11 Forwarding
Then move on to Tunnels, on the left hand window.
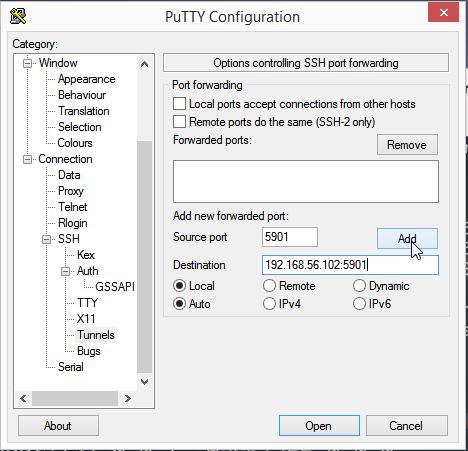
Source Port : 5901
Destination Port : <Host computer IP address>:<5901>
Click Add
Depending on your port number when your VNC session starts up, the value can change(5901, 5902, 5903 etc).
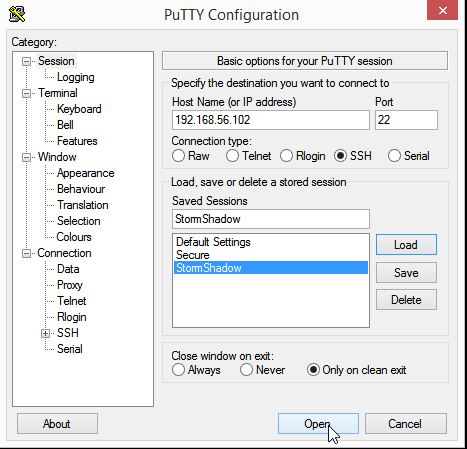
Click back on Session, and hit Save(make sure your changes are being saved to the correct session). Once that is complete you are at the finish line. Your coffee must be starting to get cold now.
Run PuTTY again, and this time double click directly on your saved session. In the screen below, login using your details.
You should get a screen similar to the one below,
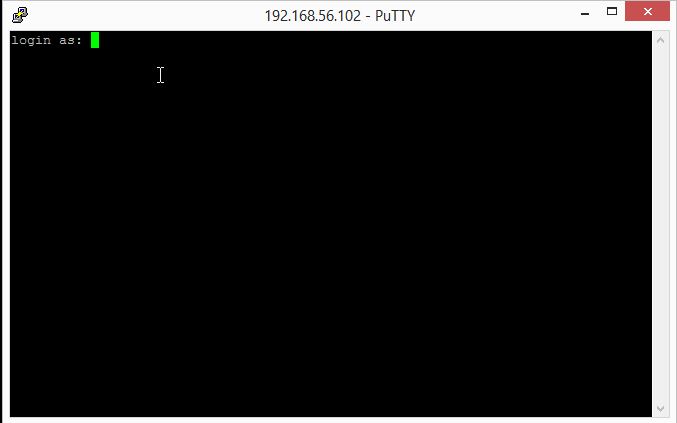
Enter your details here, user name and password and you should be logged in. Next fire up the TightVNC viewer on your client computer.
Under Remote Host, type in localhost:1 (1,2,3 depending on which port the VNC session is running, 5901,5902,5903 etc). In our case it’s 5901, hence localhost:1.
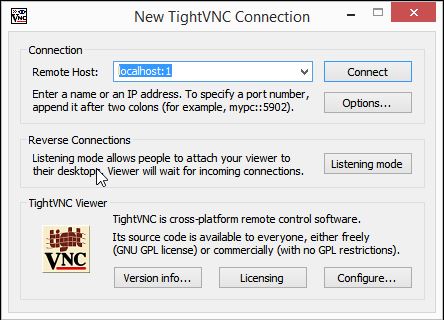
If it’s correct, it will show you the window for VNC Authentication.
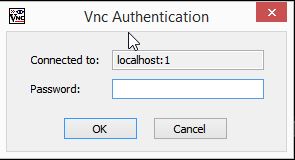
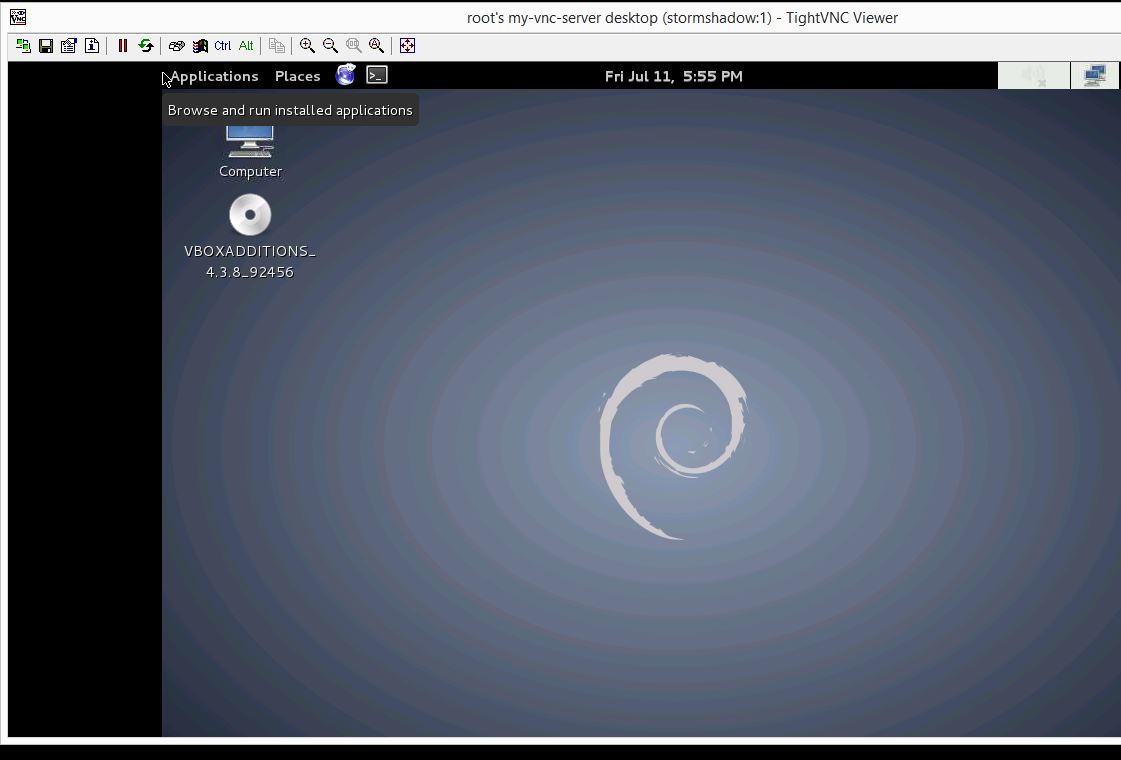
Once you enter the correct credentials, you should be logged in into your host computer over SSH. And by now, you should be done with your first cup of coffee. The second cup, well you should enjoy that for getting it setup correctly. If not set-up, you can sip that while troubleshooting errors/issues. 🙂
Final Comments
While most would not need to tunnel VNC connections over SSH, however like said before VNC is not a secure connection. Tunneling it over SSH, makes it secure, and well that is what we love.
Thank you for reading. Hope this tutorial was of help to you. Feel free to fill in comments below.
Comments
6 responses to “Easy way to tunnel VNC over SSH?”
The big problem with VNC is lack of security for remote access. One way to fix this problem is to tunnel the client to server connection through SSH. As usual with secure communication there are right ways and wrong ways to do the job.
Nice concise post. One thing you need to explain a bit more ..
“Next fire up the TightVNC viewer on your client computer.
Under Remote Host, type in localhost:1 (1,2,3 depending on which port the VNC session is running, 5901,5902,5903 etc). In our case it’s 5901, hence localhost:1.”
In your case it’s localhost:1, but it’s been a common issue for most of the users to find where and which port. Use some screenshots (i.e. in a Windows Machine you can hover your mouse on TightVNC or XMING to see your local port). Other than that, fantastic job. Keep it up. Cheers,
-BMO.
Thank you for your comment BMO. I see your point, and will make the necessary changes shortly. Cheers!
** EDIT **
The changes have been made to the post. Thank you for bringing it to my notice BMO.
Good read, Security Jedi.
Will stay tuned to see what else you got up your sleeve 😉
Thank you Hacktwack. More on its way! 🙂
Hello, I have modified/ added some scritps in order to print out VNC status and not searching for the IP address.If I click to X11VNC, I see system message about vnc server port and IP address, or that VNC server is closed.Here is the guide:1. sudo gainroot and edit file /usr/bin/x11vnc.sh:if [ -e /tmp/x11vnc.pid ]then killall x11vnc rm /tmp/x11vnc.pid echo VNC server stopped else /sbin/ifconfig -a |grep addr: |grep -v 127.0.0.1|awk {print VNC started at $2}’ |xargs echo `tail -2 /tmp/x11vnc.log` echo $$ > /tmp/x11vnc.pid export LD_PRELOAD=/usr/lib/libosso-ic-preload.so exec /usr/bin/x11vnc -cursor arrow > /tmp/x11vnc.log 2>&1fiexit 02. Create /usr/bin/myx11vnc.py file and chmod 755 /usr/bin/myx11vnc.py:#!/usr/bin/pythonimport ossoimport osdef main(): osso_c = osso.Context( osso_x11launch , 0.0.1 , False) note = osso.SystemNote(osso_c) storeRes= child = os.popen( /usr/bin/x11vnc.sh ) while 1: line = child.readline() if not line: break storeRes = storeRes + line result = note.system_note_dialog(storeRes, type=’notice’) print result returnif __name__ == __main__ : main()#End of file3. edit file/usr/share/applications/hildon/x11vnc.desktopso that it will launch your new python script /usr/bin/myx11vnc.py instead of original /usr/bin/x11vnc.shbye,Milos